Wednesday, November 21, 2012

{Melted} Snowman Ornaments

I cannot believe how easy these were to make and how stinkin' cute they turned out! I've seen them all over Pinterest (search melted snowman ornament) and after looking at a few different blogs I learned one thing: you can pretty much use whatever supplies you want! If you know me, I'm a 'use what I have on hand cause I don't want to put shoes on and go to the store' kind of girl so this is perfect for me!


All of my supplies came from Walmart, Michael's and my craft room. I already had the glass bulbs from the No Mess {Glitter} Ornaments post that I did earlier. As I was making these I thought it might be better to use plastic bulbs in case the kids want to play with it but I realized quickly that the snowman will get lost if the bulb is shaken up. I'm not sure how to prevent this {so let me know if you have ideas!} but I figured if the ornament was glass it would be less likely to get into tiny hands. But on the other hand, if it does get broken, it will be messy. So you decide!


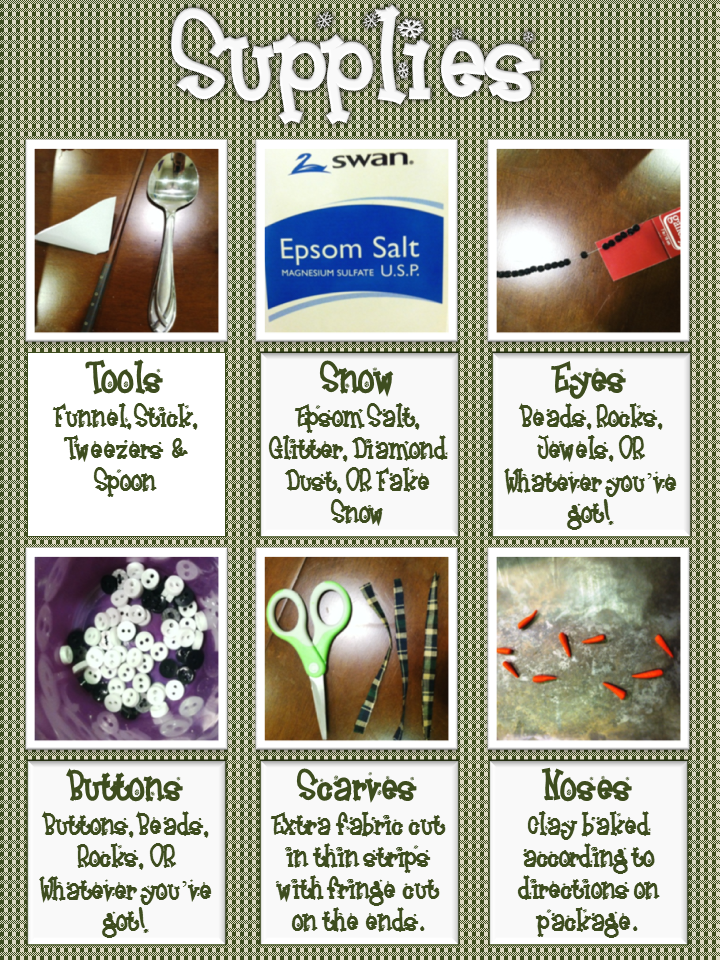
If you don't have a funnel, take an envelope, cut off the corner and then snip the corner of that. Voila! Instant funnel! You'll also want a stick or tweezers to place items where you want them in the bulb. I used a chop stick but I think anything long and skinny would work. The spoon is for measuring the snow. I measured the first one and then just dumped the rest in until they were close to the same level. Add as much or as little as you want. I liked them about 1/3 full. Just remember, the more you add, the heavier your ornament will be.
I've found many variations for the snow, eyes and buttons. Use what looks good to you. I liked the subtle sparkle of the epson salt, the jagged twinkle of the beads, and the tiny buttons were just adorable!
For the scarves I used some fabric that I had left over from a blanket I made years ago for my husband. It was the most scarf-y material I had. Use whatever you have on hand or try the scrap bin at the fabric store. You don't need very much at all. Mine are about 3 inches long but again, do what looks good to you!
If you can find mini carrots, awesome! Saves you a step. Maybe try a doll making shop. Possibly Hobby Lobby. My Hobby Lobby is 30 minutes away so I opted to make my own out of clay. They turned out so cute though I think I prefer it this way.


Assembly turned out to be much quicker and easier than I thought it would be. This would make a fun kids craft or little or big kids. And if your little kids make one and end up shaking it up, it becomes a seek and find ornament! Bonus!

If you have any questions, suggestions, or if you make your own please feel free to leave a comment!
 

Tuesday, November 6, 2012

No Mess {Glitter} Ornaments

Quick and easy craft! No mess {glitter} ornaments. The trick is, the {glitter} is on the inside so it doesn't get all over everything. You can leave them plain like the one I did below or personalize them anyway you want using vinyl, stickers, paint, ribbon, etc. I plan to add vinyl and ribbon to mine later.
 
Supplies:
Clear Ornament
Adhesive and Water OR Pledge Floor Care Finish
Glitter {fine works best}
Embellishments including ribbon, paint, and vinyl
 
I used what I had on hand which was a mixture of Alene's Tack It Over and Over adhesive {found at craft stores} and water. But I later found a blog that uses floor wax. I don't know which is better but I do want to try their technique.
The first step is obviously get a clear bulb. I found mine at Hobby Lobby for half off. I believe it was $4 for a pack of 12. I also got some giant bulbs that I'm excited to decorate!
Now remove the top carefully. When I made my bulb I made a mixture of glue and water and added it to the bulb. Not sure exactly how much of each but it was pretty runny. I rolled the ornament around so the entire inside was covered. Then I dumped the rest back into my bottle. Make sure to roll it, not shake it. You don't want the glue to bubble up. Next I poured in my {glitter}. Again roll it around so all the sides are covered. Cover the hole with your finger and lightly shake it so it covers around the opening. Finally, dump the excess {glitter} back into the container. You may have to tap, roll, and shake it to get it all out. Last, put the top back on and you're done! As you can see I have a lot of work still to do.
These are great if you don't like the mess from regular {glitter} ornaments or for a fun craft to do with the kids. Or maybe you just can't find the right color bulbs for your tree. I plan to personalize these with names and the year. Let me know how your no mess glitter ornaments turn out!
 
Thanks to the following for letting me take something from your closet!

Monday, October 29, 2012

28 Days of {GF} Freezer Meals

**THIS POST IS A WORK IN PROGRESS. SOME OF YOU HAVE BEEN ASKING FOR THE RECIPES I'VE BEEN USING SO I'LL START POSTING AS I GO. CHECK BACK FOR UPDATES**

The idea behind this project is two-fold. Save money by not eating out and by not wasting food and second make life easier when I get done working and am too tired to cook. I've been doing some research on this for a while. What freezes well, what doesn't, how long things last, etc. I also wanted to find some good {gluten free} meals so I wouldn't give in the peanut butter sandwich that is constantly calling my name since I was diagnosed {gluten intolerant}. When I've worked all day and I'm tired it is so easy to have a pb&j on {gluten} filled bread or just pour yet another bowl of cereal. This isn't very healthy for my family and it makes me feel extra lousy. So I decided I would put together a month's worth of meals that I could just pull out of the freezer and throw in the crock pot/microwave/oven. The reason I chose a month is because we only go grocery shopping once a month usually. You could do more or less. Perhaps start with two-four meals that you can do while the kids are napping. It's really up to you! Almost all of the recipes I'm using this month came from Jaima at Ring Around the Rosies. She has Celiac's disease so all of her recipes are {gluten free} which makes one less step for me. Being new to the {gluten free} world, I can't tell you how grateful I am for this. It can be pretty tough to get started. Now on to the good stuff!

{Breakfast}

Strawberry Banana Muffins


http://www.ringaroundtherosies.net/2012/04/more-freezer-cooking-meals-part-3.html

Mini Omelet Cups

 http://www.ringaroundtherosies.net/2012/08/freezer-cooking-part-5.html

Waffles

 Make according to GF Bisquick directions (or your favorite waffle recipe). Freeze flat and then put them in freezer bags. Defrost in microwave and then pop them in the toaster to crisp them up.

Banana Nut Muffins

 http://www.ringaroundtherosies.net/2012/08/freezer-cooking-part-5.html

Chex Cereal

 Not everything can come from the freezer! Like I've mentioned before, Chex makes multiple, delicious GF flavors.

Oatmeal

 Nothing warms you up on a cold morning like a bowl of oatmeal. Make sure to check for gluten!

{Lunch}

 Mini Corn Dog Muffins

 http://www.ringaroundtherosies.net/2012/02/freezer-meals-part-2.html

Individual Mac & Cheese

 http://www.ringaroundtherosies.net/2012/02/freezer-meals-part-2.html

Mini GF Piza Cups (20)


http://www.ringaroundtherosies.net/2012/04/more-freezer-cooking-meals-part-3.html

Mini Meat Loaf Cups

 http://www.ringaroundtherosies.net/2012/04/more-freezer-cooking-meals-part-3.html

Mini Spaghetti Cups

http://www.ringaroundtherosies.net/2012/08/freezer-cooking-part-5.html

Leftovers

Part of our goal was not to waste food so I know we'll be eating last night's dinner more than once!

{Dinner}

 Teriyaki Chicken

 http://www.ringaroundtherosies.net/2012/02/freezer-cooking.html
Bonus! Homemade Teriyaki Recipe
I searched everywhere and could not find a {GF} teriyaki sauce so I was worried I wasn't going to be able to make this recipe. But we really like teriyaki chicken so I had to find a way. I knew it was made using soy sauce and I did have some {GF} soy sauce so of course I turned to my new search engine, Pinterest, and came across this homemade version.
http://heavenlyhomemakers.com/homemade-teriyaki-sauce-no-msg-or-hfcs

BBQ Chicken

 http://www.imaceliac.com/2012/03/gluten-free-freezer-meals.html

BBQ Pork Chops

 http://www.imaceliac.com/2012/03/gluten-free-freezer-meals.html

Chicken Stir Fry

 http://www.imaceliac.com/2012/03/gluten-free-freezer-meals.html

Savory Chicken

 http://www.ringaroundtherosies.net/2012/02/freezer-cooking.html

Sweet & Tangy Meatballs w/ GF Spaghetti

 http://www.ringaroundtherosies.net/2012/02/freezer-cooking.html

Slow Cooked Beef Fajitas

 http://www.ringaroundtherosies.net/2012/02/freezer-meals-part-2.html

Beef Roast

 http://www.ringaroundtherosies.net/2012/02/freezer-meals-part-2.html

Cilantro Lime Chicken w/ Black Beans and Corn

 http://www.ringaroundtherosies.net/2012/04/more-freezer-cooking-meals-part-3.html

Divine Chicken

 http://www.ringaroundtherosies.net/2012/04/more-freezer-cooking-meals-part-3.html

Chicken Cassiatore

 http://www.ringaroundtherosies.net/2012/08/freezer-cooking-part-5.html

Pepper Steak

 http://www.ringaroundtherosies.net/2012/08/freezer-cooking-part-5.html

Taco Soup

 http://www.ringaroundtherosies.net/2012/08/freezer-cooking-part-5.html

Baked Green Chili Enchiladas

http://www.ringaroundtherosies.net/2012/08/freezer-cooking-part-5.html

For more {gluten free} recipes, follow me on Pinterest! http://pinterest.com/whitnichol/gluten-free-recipes/

Thanks to the following for letting me take something from your closets!

Friday, October 19, 2012

She's a {big girl} now!

Wet panties: 5  Poopy panties: 2  Potty: 1

Okay so maybe those stats don't exactly scream success but I do consider today to be a step in the right direction.

Right step #1   She wore panties all day. Usually once we're out of clean ones I break down and put her back in a diaper. Today we through them straight in the washer so we had more when we needed them. Potty training is really giving my washer a work out. Hopefully it will lead to better days ahead.

Right step #2   Lately when {The Bean} would go potty in her panties she would just sit in it and sometimes would even freak out if I tried to change her just like when she is in a diaper. It's my understanding that one component of successful potty training is when the child realizes they don't like sitting in soiled pants they want to use the potty to avoid that. Well today when she would wet her pants she would take them off. Was she using the toilet? No, but at least she's starting to realize dirty underpants aren't real fun.

Right step #3   Today I changed my attitude toward accidents. I'm still working on patience when it comes to cleaning poopy panties, in fact I would rather do ANYTHING else but when I don't get mad at her for having an accident a funny thing happens. I don't get mad. It's much easier to stick with something that isn't constantly ticking you off. I'm hoping that by taking some of the pressure off of her for having an accident, she will go back to wanting to do it herself.

We were actually doing really well for a while but one day she just decided she didn't want to do it anymore. So we took a break but now we're going all the way wether I like it or not. Some people might say that changing methods and taking breaks won't work because kids need consistency. But if something isn't working being consistent is not going to change that. When we find our groove we will work on consistency.

What are some of your potty training tricks?

Thursday, October 18, 2012

{Homemade} Laundry Soap

On Saturday I finished off our laundry soap. This was the day I had been looking forward to since I saw a pin on Pinterest with a recipe for {homemade} laundry soap. I had wanted to try this for a long time but hadn't been able to find a recipe I really liked. When I came across this recipe I knew this was the one for me. I told {The Man} and like he often is about ideas I find online or on TV he was a little unsure. He had all kinds of questions and I was able to shoot down every one {and then I secretly hoped it would live up to what I had read on the blog}. Finally, he gave in with one last "this better work well and it better smell good". So as soon as I poured those last few drops of detergent into the washer we headed to Walmart to get the supplies. I had already scoped it out weeks earlier to make sure they carried everything we needed. They had rearranged the aisle so we had to do a little searching but in no time we had everything we needed except for the washing soda. I looked at every package and read every price sticker until I came across one on an empty shelf that read washing soda. Exactly what I was looking for. So we bought everything else and I figured I'd get some later. Luckily my husband mentioned stopping at Smith's and they had a whole shelf full.
So we went home and I got to work. The most time consuming part is shredding the Zote soap. Make sure you use the smaller side of the grater. I got about a quarter of the way through the first bar when I realized my mistake. I layered all of my ingredients in a large bowl so it was easier to stir.
My house smelled so amazing as I was mixing everything together. I was loving it. On the blog she had mentioned using the Purex bottle to store some of it for quick and easy access {it makes way more than what would fit in the bottle}. And one of the best parts of this whole mixture is that it only takes 1-2 tablespoons per load so it will last forever! The lid to the Purex bottle has three lines on it and the middle one is about 2 tablespoons. Easy right!? Not really. I find that the Zote soap clogs up the hole and makes it hard to pour. 
But I had put the rest of the soap in small tote to store it so it is easy to open the lid slightly and scoop out what I need. Like all powder detergents you should add it to the water before adding your clothes. It doesn't sud but trust me, this soap works great! It cleans our clothes well and makes them smell amazing! Plus, it has fabric softener in it so there is no need to add anything else. It also contains OxyClean and baking soda so it can get out a lot of stains that might otherwise require bleach. Now for my favorite part, IT MAKES MY LAUNDRY ROOM SMELL AMAZING! Seriously, sometimes I just go in there to smell. It is heavenly! Don't be surprised if you receive some of this awesomeness from us when Christmas time rolls around. It's not because we think you're dirty, it's because it is so amazing I just can't keep it to myself! So if you're thinking of trying it but just not sure, let me know and I will give you some of mine. But seriously, there is no reason not to just make it yourself. I'm sure you'll love it just as much as I do.
 
Thank you to the following for letting me take something from your closet!

Saturday, October 13, 2012

Easy as 1-2-3! {Sand, Stain, Vinyl}


Yesterday I finished a project that I'm very excited about. I was asked to do two signs. My only direction was "You're creative. I trust whatever you do will look good". So with that in mind, I had no idea where to start. Should I paint the wood and add vinyl letters? Should I paint the wood and use a vinyl stencil to paint the letters? What color paints should I use? Should I stain the wood and add vinyl letters? I had no idea. So first I had {The Man} cut my wood for me. He was already cutting up a post for another awesome project I'm working on so it was no big deal.

Next came the fun part. Sanding. I REALLY want to invest in a good power sander. It would totally be worth it for me. I've already asked for one for my birthday/Christmas. Or I found one at Walmart for only $30 that I may end up buying and forgetting to tell my husband about for a while. {He works with power tools all day, every day so he doesn't believe in buying cheep ones. He wants them to work well and last a long time.}

Once everything was silky smooth it was decision time. Paint or stain? I looked through my paints and since I wasn't sure what color she would want I decided to do black or white. Both were pretty much gone. I really wasn't in the mood to run to the store for more so my decision was made. Stain. I've only stained wood once before. It wasn't a disaster but I found painting to be much more forgiving especially on the edges of the board. I'm sure this could be solved with a good power sander though... So I grabbed my wood conditioner and started applying it to the smaller of the two signs. I used Minwax Pre-Stain Wood Conditioner left over from my last staining project. I think I got it at Home Depot. I figured I'd do the small one first and then if I didn't like it we could cut a new one. Once the wood conditioner sat for a couple minutes I wiped off the excess and applied the first coat of stain. I had two colors to choose from, ebony or dark walnut, both from Minwax. I got this from Walmart. I had decided to use white vinyl so I knew I wanted it dark but I though ebony might be too dark.

I put on the first coat of stain and I loved the color. That is, until I wiped off the excess. It was lighter than I was expecting and looked dull, not rich and shiny like the wet stain. So I added another coat and another. It was still lighter than expected. Honestly, I didn’t like it and I even told my husband I had to start over. He said he thought it looked really good and if I wasn’t going to use it for this project I should use it for something for us. I’m still not sure if he was telling the truth but I decided to stick with it anyway. I prepped the larger sign and applied the first coat of stain. The wood soaked it right up and it actually looked pretty good. I ended up only doing one coat on this one. I let both signs dry overnight.

The next morning I applied the vinyl I had cut using my Cricut and the SCAL2 software. I order all my vinyl from Expressions Vinyl. They are awesome! They have an amazing selection and great customer service. I’ve never had any issues with their products or service.

The signs were already looking better. There was only one thing missing, the clear top coat. I used Krylon Crystal Clear Flat Spray. It added just enough shine to the stain to finally make me proud to put my name on the signs. They actually looked really good! When this dried I added hardware to the back so they could be hung and I couldn’t wait to deliver them.
 

 When {The Bean} and I dropped them off everybody loved them. I held them up on the wall where they were going to go and they looked like they belonged. It was definitely a success! After this experience I think I finally have the confidence to do what my husband has been telling me to do since he bought me my Cricut, make and sell my creations. I’ve always been afraid that I would spend a bunch of money on supplies and then no one would buy from me and everything would end of sitting around collecting dust. I’m hoping to be able to make a few Christmas themed items and trying to sell those for a little extra Christmas cash. If it goes well, I’ll try and venture outside the Christmas aisle. So if you or anyone you know could use a sign or decoration with vinyl let me know!! I’m really excited and hoping that everything will work out.

Friday, October 12, 2012

{Gluten Free} Meal Reviews

So I've gotten a little behind on my {gluten free} meal reviews. To be honest, I've lost some of my oomph. There have been many days where I feel like there's no point even eating if I can't eat something I enjoy. Some things have been pretty tasty but nothing comes close to a Belgium waffle or German pancake. Or a steamy piece of pizza on a Friday night. Some days I just crave a simple pb&j. So it's kind of been going back and forth. I'll do great for a couple days and then I give up for a couple days. It's a work in progress. But here are some of our thoughts on a few of the recipes we've been trying.

Chex {Gluten Free} Apple Cinnamon Cereal
Very yummy. I'm really digging these Chex cereal flavors. Even if I wasn't worried about {gluten}.

Cottage Cheese, Fruit, Vegetable Crudites

So I've got to be honest, I didn't know what a crudite was when I looked at the meal plan. According to my research, it's chopped up veggies dipped in a sauce or dressing. So a veggie tray. Taste wise this was a good lunch although I did feel more like I was snacking than actually eating a meal. Ellie enjoyed it though. She was able to pick out the things she liked best.

Strawberry Spinach Salad

Not bad. I like poppy seed dressing but this {gluten free} brand wasn't as good as other brands I've tried. Plus, as I've said before, I'm not much of a salad fan over all.

Chicken and Potato Grill-Fry

Everyone liked this one. The recipe recommends serving it with ketchup but I only like ketchup on hamburgers and hot dogs so I used bbq sauce instead. Tasty.

Royal Red Robing Burger on a Gluten Free Bun

So obviously I didn't make this but I had to include it anyway. Red Robin carries {gluten free} buns!! From what I've read online they are Udi's {gluten free} buns but I don't know if that's what all locations carry or just the one I read about on a blog somewhere. Either way, it was delicious!! The other option is to replace the bun with lettuce, I believe they call it protein-style. The only sad part is that their amazing fry sauce is NOT {gluten free}. I was pretty bummed about that one.

Homemade Mac & Cheese
 
This cheesy bowl of goodness was actually one of my own creations. Ellie asked for mac and cheese for lunch and I didn't want to make a whole box just for her so I looked around online for a {gluten free} homemade recipe. Of the ones I could find, I didn't have all the ingredients for any of them. So I decided to throw together my own. So here is my approximate recipe. I didn't actually measure anything but this should be close. Brown rice macaroni noodles cooked till done. Drain. Stir in 1-1 1/2 cups of shredded chedder cheese, 1 ounce cream cheese, 1/4 cup milk, and sprinkle some parmesan cheese on top. Stir till it becomes one big pot of gooeyness. Sprinkle on some salt and pepper and enjoy!!
 
Chunky Spaghetti with rice pasta
This was really good. We are spaghetti fans. The sauce is definitely more chunky than saucy but it is still tasty.


Do I even have to say it? AMAZING! Peanut butter. Cookies. {Gluten free}. Duh! Of course they were good! And super easy, only four ingredients! They were slightly grainy and crumbly but still delicious!

Thank you to the following for letting me take something from your closets!