Wednesday, September 10, 2014

Hey You Mom!

Hey you working mom! Being a stay at home mom is hard! Try having a small human (or many) hanging on you all day, every day. Don’t forget wearing said human’s snot, spit up, etc on your clothes no matter how careful you are. It will wear on you.

Hey you stay at home mom! Being a working mom is hard! Try leaving your kids all day, every day and being productive while half of your brain is at home. And then coming home to squeeze in a full day of parenting and housework in just a few hours. It will wear on you.

Hey you working mom! Try spending every second of your life, day in and day out, catering to the needs of a little dictator with no breaks. No second alone in the bathroom to play candy crush. If anything, it’s mentally exhausting!

Hey you stay at home mom! Try being on someone else’s clock, day in and day out, not able to kiss your baby when they fall, or go home and help them when they need you. Wanna take your kids to the event at the library? Too bad. Your daughter wants to take dance but the classes are in the middle of the day? Sorry. Your son has a doctor appointment? You better hope you get permission to leave in the middle of that big meeting. Need to run a couple errands and clean the bathroom? You’ll have to save those tasks for your precious weekends.

Hey you working mom! You’re worried about missing these treasured years with your kids? That sucks!

Hey you stay at home mom! You’re worried if you’ll ever be able to get a job when your kids are grown because of the huge gap in your resume and your lack of professional experience? That sucks!
Hey you working mom! We know you miss your kids. But you’re doing what is best for your family. Don’t feel bad that you don’t stay home!

Hey you stay at home mom! We know you don’t sit around all day and do nothing. Keeping up a house especially with tiny tornadoes running around is a tough job. Don’t feel bad that you don’t go to work!

Hey you working mom! You’re not better or worse than a stay at home mom. Your job is not harder or easier. Be nice.

Hey you stay at home mom! You’re not better or worse than a working mom. Your job is not harder or easier. Be nice.

Hey you working mom! Take a minute for yourself. Everything else will be a little bit easier.

Hey you stay at home mom! Take a minute for yourself. Everything else will be a little bit easier.

Monday, April 28, 2014

Leftover {Chocolate} Recipe

This post was inspired by a business just down the street from my house. I drove by the other night and saw their sign said something along the lines of "There are no leftover chocolate recipes".

The second I saw it I had to text my husband because it reminded me of a creation he and a friend had come up with while serving a mission for our church. They called it the Maplin bar. {Their names are Mason and Esplin, hence Maplin}. Basically, they took all the leftover holiday chocolate that everyone was giving them and combined it into one huge bar. When they did this they found that although they were sick of the candy bars on their own, together it gave them a whole new taste. Esplin (sorry Elder Esplin I don't actually know your first name) actually gave us a Maplin bar for our wedding in a small Christmas themed bread pan. I did not get it at first so my husband had to tell me the story.

Now the recipe is simple.
1. Gather all your leftover chocolate.
2. Unwrap and place in a small greased pan or muffin tin depending on how much chocolate you have. You may want to cut it into smaller pieces for a more even mixture. Or you can leave the candy bars whole and you'll have a few surprises as you go through your finished bar.
3. Now bake at 350 degrees until melted. Make sure you don't burn it! You'll have to watch because it will melt differently depending on the types of candy you are using.
4. Put it in the fridge or freezer to cool and become hard.

Now if you still have any Easter candy leftover, throw it together into a Maplin bar and enjoy!

Friday, November 8, 2013

Granola Mom Or Just {Cheap&Lazy}

A while back I read a post on one of the pregnancy forums that went something along the lines of Where are the granola moms at? The breastfeeding, baby wearing, cosleeping, baby food making, cloth diapering moms. And I thought I do almost all of those things but I'm not granola at all. I'm just {cheap & lazy}.

I breastfeed because formula is expensive and honestly when I had my first child it never really occurred to me that there was an alternative. I just thought breastfeeding was what you did. My daughter did have formula. We had a rocky start so we supplemented sometimes. And I lost my supply around nine months when I returned to work so we finished off her first year on only formula. I have nothing against it besides the fact that its expensive and breast milk is free. And easier most of the time. My son is just over two months and has never had formula. At this point I'm starting to feel like its a game. Let's see how long we can go without buying formula. Challenge accepted!

Baby wearing seemed obvious too. Why fumble around getting a bulky stroller in and out of the car when you can throw your kid in a carrier and go? And why not have your hands free to do stuff around the house when they just want to snuggle? Again, it just seemed easier.

Now cosleeping, this one is definitely me being lazy. My babies always start out in their beds but then I have to feed them and I'm exhausted so we lay down in bed and I pass out. A few hours later we wake up with everything still hanging out so we pop it back in and I'm back asleep.

Making baby food was an obvious money saver to me. Those cute little jars are so expensive and most of them don't smell all that appetizing. So I thought why not just blend up the same food we eat? They're going to be eating it soon enough anyway.

The only "granola" thing I wasn't doing according to her post was cloth diapering. I wanted to try CDing from the time {The Bean} was a baby but there are so many choices it was just too intimidating. Plus the initial investment seemed pretty steep. But over time it's supposed to be a huge money saver which was the reason I was interested. Of course with her I was never able to take the leap. But now that I've had my second baby it keeps popping into my head again. I was fortunate during this pregnancy to join an amazing group of ladies that were all due within the same week that I was. A few of them cloth diaper and have been nice enough to answer my millions of questions even though I know they're probably thinking "just do it or shut up already!" So today I finally ordered my first cloth diapers. Three of them to be exact, for $5 a piece. They won't be here for a few weeks but I hope I like it and can save a bunch of money with it.

One thing that wasn't on her list that seems a little "granola" to me is home schooling. But now that {The Bean} is getting older I'll admit, I've thought about it a few times. But in the end, the socialization she'll get at public school along with the free time I'll get will always win out. We are having fun doing our own preschool lesson plans though and I am always amazed by what a little genius she is.

So am I a granola mom? I'm still going to say no. Will I do whatever I have to do to save money and make things easier for myself? Am I {cheap and lazy}? You bet ya! But I can't imagine being a mom any other way!

Tuesday, May 7, 2013

{Chore} Charts

If you look at my Pinterest board lately you will find all kinds of awesome chore charts and systems for both kids and adults. Since I've been pregnant, I have been so tired and last thing I want to do is spend hours cleaning the house. I have considered all kinds of charts, lists, and incentives to help get the job done.

Lately we've had a lot of company staying at our house. It seems like when company is coming, that is the only time our house gets really clean. So we deep cleaned everything for the first wave of people. By the time we were getting ready for the third wave I realized {WARNING: huge no brainer here} that it's much easier to clean the house when it's been done recently. Duh! So rather than get behind and then spend an entire Saturday catching up I decided I needed a chart that did a little each day. I knew I had to make it be just a little or we'd never stick to it.

Last night I came across a blog post on Pinterest called I Don't Do Spring Cleaning and of course it caught my eye because I don't do spring cleaning either! So I started reading through and saw that she uses a list called 31 Days to a Clean Home by Clean Mama. If you haven't check out her blog before, do it. It's awesome! I've actually printed this same list and used it for one month. Probably need to do it again...

The second list she talks about is from Tip Junkie. This list is called Week at a Glance Cleaning Check List. I really liked the concept of this list since it had a couple jobs to be done each day and some to be done each week. But I felt like it wasn't quite right for our family. So I decided to tweak it and make it my own.


For the first month or two I plan to simply print it out and cross things off as we go. Then as we figure out what works and what doesn't I'll make a few changes and re-print it in color and laminate it. Then we'll cross things off each week with a dry erase marker.

Of course I couldn't leave {The Bean} out though. She loves to help around the house. She is constantly asking me "what job can I do?" So I tried to think of a few of the jobs that she can do and created her own chore chart just like Mommy and Daddy's.


I know that her chart will be changing all the time as she grows and develops new skills. And I know that our new system won't be perfect. But hopefully over time, as we develop new habits, it can become perfect for us.

I also plan to create a master to-do list for those big jobs like cleaning and organizing the storage unit. I found a home management binder that I {love} that includes a master to-do list at DIY Home Sweet Home. If you are thinking of doing a home management binder you have to check out her free printables. I've got the entire binder saved and I'm trying to decide if I want to tweak it for me or just print it as it. I'm thinking of tweaking it along with a few other binder kits so they all match.

Thank you to the following for allowing us to take something from your closets:

Thursday, January 3, 2013

My {New Year} Resolution

I hadn't really put any thought into a resolution for this year. In fact, I figured I would just skip it since I never stick with it anyway. But tonight I was looking through Pinterest for home stuff and it came to me. I've been wanting to re-do Ellie's room since the last time I did was before she was born. I've also wanted to makeover our laundry room cause I've found tons of cute ideas for it online. And it's a small enough room I think I can actually do it without getting overwhelmed like I usually do when I start thinking of decorating our home. I also have a couple closets and a pantry that are in desperate need of some attention.

So I've decided to come up with twelve projects and tackle one each month. The biggest stress in my life {after my child} is coming home from work and seeing all the work I have to do around the house. Not to mention the fact that I HATE cleaning especially with a toddler around that instantly dirties whatever I just cleaned. I hope that by better organizing our home, it will be easier to keep it clean and life will be less stressful which will result in a much happier me. So here’s my list and a couple ideas for them. If you have any helpful ideas I am all ears!!
 

{January}              Pantry Makeover
This task is first because it is the worst right now. Plus I’ve noticed a weird smell lately so I need to figure that out soon. I also want to work on gathering extra food for food storage this year so I’d like to get it organized so we can fit more in there and it will be easier to see what we have and rotate it.
Pinned Image
http://pinterest.com/pin/47006389832342452/
Pinned Image
http://pinterest.com/pin/127297126936984894/
Pinned Image
http://pinterest.com/pin/47006389832428182/

{February}             Master Closet
This is also very much a need right now. Imagine a bomb full of shoes and clothes that exploded in a little room. This project will also include going through my clothes and getting rid of what I don’t wear because right now so much of it doesn’t fit or is worn out. I feel like my closet it lying to me every time I go in to get dressed. It looks like lots of clothes but I have nothing to wear. I am also trying to learn how to put an outfit together better and how to mix and match so I need to start with a good foundation.
Pinned Image
http://pinterest.com/pin/47006389831725610/

{March}                Hall Bathroom
The reason this is toward the top of the list is because it’s always so hard to find things in there. And we have a drawer full of medication that isn’t locked up but luckily {The Bean} hasn’t shown any interest in. I feel like this needs to be remedied before it causes a problem. Finally, there are certain items I feel every guest bathroom should have {extra TP, spare toiletries (womanly and hygiene), a garbage can, clean towels, and a clean hand towel}. So many times I’ve been placed in the awkward situation at someone else’s house where I’m searching through drawers looking for toilet paper or I wash my hands and I’m trying to shake them dry so I don’t have to walk out with wet hand prints on my pants.
Pinned Image
http://pinterest.com/pin/47006389832428002/
Pinned Image
http://pinterest.com/pin/47006389832426308/
Pinned Image
http://pinterest.com/pin/47006389831186692/

{April}                   Master Bathroom
This task is next because it should be easier to do it right after doing the other bathroom. This is the bathroom that we use most {obviously} and it gets dirty easily. I’m hoping with a little organization it will be easier to find what we need and put it away afterward so the counter isn’t always covered in stuff. It could also use a good deep clean. I tend to clean house from the front to the back and the master bathroom and closet are at the VERY back.
Pinned Image
http://pinterest.com/pin/47006389832426319/

{May}                    Storage Unit
We really wanted to do this before it got cold but we didn’t get around to it. But as soon as it gets warm out it will be done! Since we basically have unlimited storage we through a lot of stuff in our storage unit and offer to keep other people’s stuff for them for what so far seems to be unlimited amounts of time. I really want to get some shelves and get our holiday decorations and seasonal gear set up in a way that it is quick and easy to get to.

{June}                  {The Bean’s} Bedroom
I figure since her birthday in is June this would be a good time to re-do her room. I’ve wanted to get her a bigger bed for a while. I’d love to get a full size bed so we can use it when guests come but the room isn’t very big so we’ll probably end up with a twin. A twin would still be fine though because then she can use my old bedroom set.
Pinned Image
http://pinterest.com/pin/47006389832220249/
Pinned Image
http://pinterest.com/pin/104708760058353078/

{July}                    Our Bedroom
Our bedroom is pretty sad looking right now and definitely needs some TLC. We’ve wanted to get a bedroom set for years but can never afford the ones we like. So my plan for our room is to get really lucky and find some furniture at yard sales/thrift stores for super cheap that I can spruce up and we can enjoy until we can afford our dream set, someday!
Pinned Image
http://pinterest.com/pin/47006389832314585/
Pinned Image
http://pinterest.com/pin/47006389831477758/

{August}               Surprise!
August is {The Man’s} birthday month so I have a special project I have planned for him but in case of the very slim chance that he ever looks at my blog I’m not going to post it yet.

{September}          Front Closet
September is hot. So hot that I never feel like doing anything so picked a small project for this month. I may add a couple other small projects if I feel like it. This might be a good time to tackle the junk drawer or maybe the never ending paper piles.
Pinned Image
http://pinterest.com/pin/47006389832428088/
Pinned Image
http://pinterest.com/pin/47006389832428080/

{October}              Hall Closet
This is sort of the ‘catch all’ for everything that is too big for the junk drawer including holiday decorations, linens, board games, tools, Scentsty scents, wall hangings that aren’t hanging, boxes, etc., etc., etc. It’s getting a little over crowded.

{November}           Craft Room
Hopefully by next November it will be cleaner than it is right now but I’d love to get some little baskets and shelves to organize my supplies better.
Pinned Image
http://pinterest.com/pin/47006389831725727/

{December}           Laundry Room
I saved this for last because it isn’t exactly a necessity although I would like to have our cleaning supplies a little more organized. I’ve come across so many ideas on Pinterest for laundry rooms that I’d love to try a few out. A few ideas for this room include a small deep freeze, a rack to hang wet clothes, and some stacked clothes baskets. I also want to find some space in here for emergency supplies.
Pinned Image
http://pinterest.com/pin/47006389832400209/
Pinned Image
http://pinterest.com/pin/47006389831105555/
Pinned Image
http://pinterest.com/pin/47006389832310355/
Pinned Image
http://pinterest.com/pin/47006389832427898/
Pinned Image
http://pinterest.com/pin/47006389832427902/

 
Looking at my list right now it looks like a lot of work but hopefully spacing it out over the next twelve months will make it doable if not easy. {The Man} and {The Bean} will be leaving town soon for a weekend so I’m hoping to tackle the pantry then. I’ve come across a few pantry organization pins lately including one using supplies mostly from the dollar store so I’ll be putting together my plan soon.
So it looks like over the next few months you'll literally see what's inside my closets. :)

Wednesday, November 21, 2012

{Melted} Snowman Ornaments

I cannot believe how easy these were to make and how stinkin' cute they turned out! I've seen them all over Pinterest (search melted snowman ornament) and after looking at a few different blogs I learned one thing: you can pretty much use whatever supplies you want! If you know me, I'm a 'use what I have on hand cause I don't want to put shoes on and go to the store' kind of girl so this is perfect for me!


All of my supplies came from Walmart, Michael's and my craft room. I already had the glass bulbs from the No Mess {Glitter} Ornaments post that I did earlier. As I was making these I thought it might be better to use plastic bulbs in case the kids want to play with it but I realized quickly that the snowman will get lost if the bulb is shaken up. I'm not sure how to prevent this {so let me know if you have ideas!} but I figured if the ornament was glass it would be less likely to get into tiny hands. But on the other hand, if it does get broken, it will be messy. So you decide!


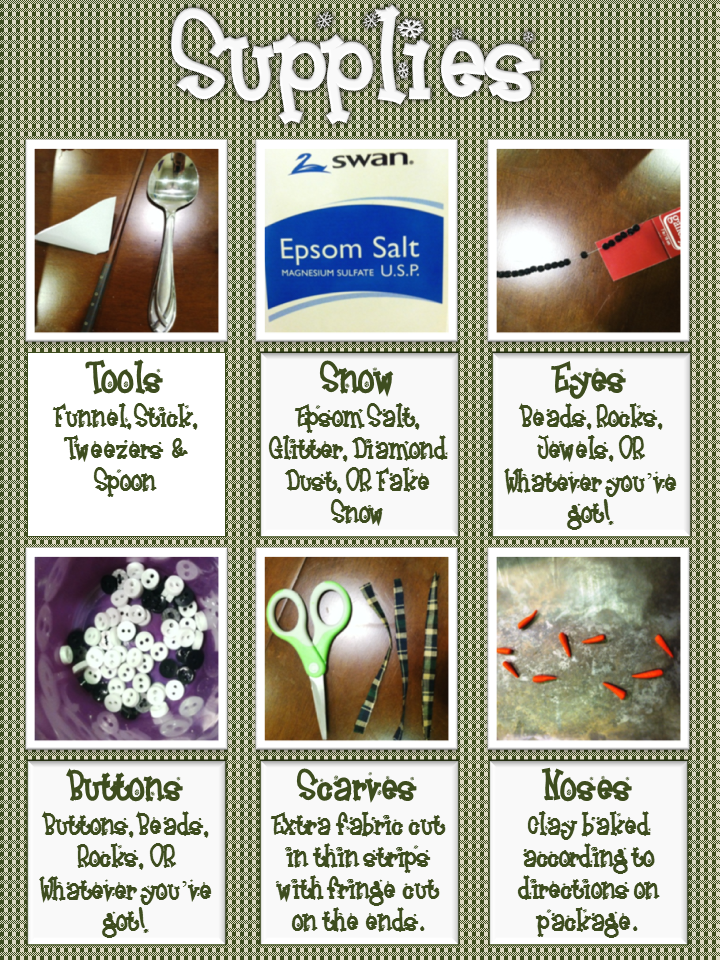
If you don't have a funnel, take an envelope, cut off the corner and then snip the corner of that. Voila! Instant funnel! You'll also want a stick or tweezers to place items where you want them in the bulb. I used a chop stick but I think anything long and skinny would work. The spoon is for measuring the snow. I measured the first one and then just dumped the rest in until they were close to the same level. Add as much or as little as you want. I liked them about 1/3 full. Just remember, the more you add, the heavier your ornament will be.
I've found many variations for the snow, eyes and buttons. Use what looks good to you. I liked the subtle sparkle of the epson salt, the jagged twinkle of the beads, and the tiny buttons were just adorable!
For the scarves I used some fabric that I had left over from a blanket I made years ago for my husband. It was the most scarf-y material I had. Use whatever you have on hand or try the scrap bin at the fabric store. You don't need very much at all. Mine are about 3 inches long but again, do what looks good to you!
If you can find mini carrots, awesome! Saves you a step. Maybe try a doll making shop. Possibly Hobby Lobby. My Hobby Lobby is 30 minutes away so I opted to make my own out of clay. They turned out so cute though I think I prefer it this way.


Assembly turned out to be much quicker and easier than I thought it would be. This would make a fun kids craft or little or big kids. And if your little kids make one and end up shaking it up, it becomes a seek and find ornament! Bonus!

If you have any questions, suggestions, or if you make your own please feel free to leave a comment!
 

Tuesday, November 6, 2012

No Mess {Glitter} Ornaments

Quick and easy craft! No mess {glitter} ornaments. The trick is, the {glitter} is on the inside so it doesn't get all over everything. You can leave them plain like the one I did below or personalize them anyway you want using vinyl, stickers, paint, ribbon, etc. I plan to add vinyl and ribbon to mine later.
 
Supplies:
Clear Ornament
Adhesive and Water OR Pledge Floor Care Finish
Glitter {fine works best}
Embellishments including ribbon, paint, and vinyl
 
I used what I had on hand which was a mixture of Alene's Tack It Over and Over adhesive {found at craft stores} and water. But I later found a blog that uses floor wax. I don't know which is better but I do want to try their technique.
The first step is obviously get a clear bulb. I found mine at Hobby Lobby for half off. I believe it was $4 for a pack of 12. I also got some giant bulbs that I'm excited to decorate!
Now remove the top carefully. When I made my bulb I made a mixture of glue and water and added it to the bulb. Not sure exactly how much of each but it was pretty runny. I rolled the ornament around so the entire inside was covered. Then I dumped the rest back into my bottle. Make sure to roll it, not shake it. You don't want the glue to bubble up. Next I poured in my {glitter}. Again roll it around so all the sides are covered. Cover the hole with your finger and lightly shake it so it covers around the opening. Finally, dump the excess {glitter} back into the container. You may have to tap, roll, and shake it to get it all out. Last, put the top back on and you're done! As you can see I have a lot of work still to do.
These are great if you don't like the mess from regular {glitter} ornaments or for a fun craft to do with the kids. Or maybe you just can't find the right color bulbs for your tree. I plan to personalize these with names and the year. Let me know how your no mess glitter ornaments turn out!
 
Thanks to the following for letting me take something from your closet!

Monday, October 29, 2012

28 Days of {GF} Freezer Meals

**THIS POST IS A WORK IN PROGRESS. SOME OF YOU HAVE BEEN ASKING FOR THE RECIPES I'VE BEEN USING SO I'LL START POSTING AS I GO. CHECK BACK FOR UPDATES**

The idea behind this project is two-fold. Save money by not eating out and by not wasting food and second make life easier when I get done working and am too tired to cook. I've been doing some research on this for a while. What freezes well, what doesn't, how long things last, etc. I also wanted to find some good {gluten free} meals so I wouldn't give in the peanut butter sandwich that is constantly calling my name since I was diagnosed {gluten intolerant}. When I've worked all day and I'm tired it is so easy to have a pb&j on {gluten} filled bread or just pour yet another bowl of cereal. This isn't very healthy for my family and it makes me feel extra lousy. So I decided I would put together a month's worth of meals that I could just pull out of the freezer and throw in the crock pot/microwave/oven. The reason I chose a month is because we only go grocery shopping once a month usually. You could do more or less. Perhaps start with two-four meals that you can do while the kids are napping. It's really up to you! Almost all of the recipes I'm using this month came from Jaima at Ring Around the Rosies. She has Celiac's disease so all of her recipes are {gluten free} which makes one less step for me. Being new to the {gluten free} world, I can't tell you how grateful I am for this. It can be pretty tough to get started. Now on to the good stuff!

{Breakfast}

Strawberry Banana Muffins


http://www.ringaroundtherosies.net/2012/04/more-freezer-cooking-meals-part-3.html

Mini Omelet Cups

 http://www.ringaroundtherosies.net/2012/08/freezer-cooking-part-5.html

Waffles

 Make according to GF Bisquick directions (or your favorite waffle recipe). Freeze flat and then put them in freezer bags. Defrost in microwave and then pop them in the toaster to crisp them up.

Banana Nut Muffins

 http://www.ringaroundtherosies.net/2012/08/freezer-cooking-part-5.html

Chex Cereal

 Not everything can come from the freezer! Like I've mentioned before, Chex makes multiple, delicious GF flavors.

Oatmeal

 Nothing warms you up on a cold morning like a bowl of oatmeal. Make sure to check for gluten!

{Lunch}

 Mini Corn Dog Muffins

 http://www.ringaroundtherosies.net/2012/02/freezer-meals-part-2.html

Individual Mac & Cheese

 http://www.ringaroundtherosies.net/2012/02/freezer-meals-part-2.html

Mini GF Piza Cups (20)


http://www.ringaroundtherosies.net/2012/04/more-freezer-cooking-meals-part-3.html

Mini Meat Loaf Cups

 http://www.ringaroundtherosies.net/2012/04/more-freezer-cooking-meals-part-3.html

Mini Spaghetti Cups

http://www.ringaroundtherosies.net/2012/08/freezer-cooking-part-5.html

Leftovers

Part of our goal was not to waste food so I know we'll be eating last night's dinner more than once!

{Dinner}

 Teriyaki Chicken

 http://www.ringaroundtherosies.net/2012/02/freezer-cooking.html
Bonus! Homemade Teriyaki Recipe
I searched everywhere and could not find a {GF} teriyaki sauce so I was worried I wasn't going to be able to make this recipe. But we really like teriyaki chicken so I had to find a way. I knew it was made using soy sauce and I did have some {GF} soy sauce so of course I turned to my new search engine, Pinterest, and came across this homemade version.
http://heavenlyhomemakers.com/homemade-teriyaki-sauce-no-msg-or-hfcs

BBQ Chicken

 http://www.imaceliac.com/2012/03/gluten-free-freezer-meals.html

BBQ Pork Chops

 http://www.imaceliac.com/2012/03/gluten-free-freezer-meals.html

Chicken Stir Fry

 http://www.imaceliac.com/2012/03/gluten-free-freezer-meals.html

Savory Chicken

 http://www.ringaroundtherosies.net/2012/02/freezer-cooking.html

Sweet & Tangy Meatballs w/ GF Spaghetti

 http://www.ringaroundtherosies.net/2012/02/freezer-cooking.html

Slow Cooked Beef Fajitas

 http://www.ringaroundtherosies.net/2012/02/freezer-meals-part-2.html

Beef Roast

 http://www.ringaroundtherosies.net/2012/02/freezer-meals-part-2.html

Cilantro Lime Chicken w/ Black Beans and Corn

 http://www.ringaroundtherosies.net/2012/04/more-freezer-cooking-meals-part-3.html

Divine Chicken

 http://www.ringaroundtherosies.net/2012/04/more-freezer-cooking-meals-part-3.html

Chicken Cassiatore

 http://www.ringaroundtherosies.net/2012/08/freezer-cooking-part-5.html

Pepper Steak

 http://www.ringaroundtherosies.net/2012/08/freezer-cooking-part-5.html

Taco Soup

 http://www.ringaroundtherosies.net/2012/08/freezer-cooking-part-5.html

Baked Green Chili Enchiladas

http://www.ringaroundtherosies.net/2012/08/freezer-cooking-part-5.html

For more {gluten free} recipes, follow me on Pinterest! http://pinterest.com/whitnichol/gluten-free-recipes/

Thanks to the following for letting me take something from your closets!

Friday, October 19, 2012

She's a {big girl} now!

Wet panties: 5  Poopy panties: 2  Potty: 1

Okay so maybe those stats don't exactly scream success but I do consider today to be a step in the right direction.

Right step #1   She wore panties all day. Usually once we're out of clean ones I break down and put her back in a diaper. Today we through them straight in the washer so we had more when we needed them. Potty training is really giving my washer a work out. Hopefully it will lead to better days ahead.

Right step #2   Lately when {The Bean} would go potty in her panties she would just sit in it and sometimes would even freak out if I tried to change her just like when she is in a diaper. It's my understanding that one component of successful potty training is when the child realizes they don't like sitting in soiled pants they want to use the potty to avoid that. Well today when she would wet her pants she would take them off. Was she using the toilet? No, but at least she's starting to realize dirty underpants aren't real fun.

Right step #3   Today I changed my attitude toward accidents. I'm still working on patience when it comes to cleaning poopy panties, in fact I would rather do ANYTHING else but when I don't get mad at her for having an accident a funny thing happens. I don't get mad. It's much easier to stick with something that isn't constantly ticking you off. I'm hoping that by taking some of the pressure off of her for having an accident, she will go back to wanting to do it herself.

We were actually doing really well for a while but one day she just decided she didn't want to do it anymore. So we took a break but now we're going all the way wether I like it or not. Some people might say that changing methods and taking breaks won't work because kids need consistency. But if something isn't working being consistent is not going to change that. When we find our groove we will work on consistency.

What are some of your potty training tricks?

Thursday, October 18, 2012

{Homemade} Laundry Soap

On Saturday I finished off our laundry soap. This was the day I had been looking forward to since I saw a pin on Pinterest with a recipe for {homemade} laundry soap. I had wanted to try this for a long time but hadn't been able to find a recipe I really liked. When I came across this recipe I knew this was the one for me. I told {The Man} and like he often is about ideas I find online or on TV he was a little unsure. He had all kinds of questions and I was able to shoot down every one {and then I secretly hoped it would live up to what I had read on the blog}. Finally, he gave in with one last "this better work well and it better smell good". So as soon as I poured those last few drops of detergent into the washer we headed to Walmart to get the supplies. I had already scoped it out weeks earlier to make sure they carried everything we needed. They had rearranged the aisle so we had to do a little searching but in no time we had everything we needed except for the washing soda. I looked at every package and read every price sticker until I came across one on an empty shelf that read washing soda. Exactly what I was looking for. So we bought everything else and I figured I'd get some later. Luckily my husband mentioned stopping at Smith's and they had a whole shelf full.
So we went home and I got to work. The most time consuming part is shredding the Zote soap. Make sure you use the smaller side of the grater. I got about a quarter of the way through the first bar when I realized my mistake. I layered all of my ingredients in a large bowl so it was easier to stir.
My house smelled so amazing as I was mixing everything together. I was loving it. On the blog she had mentioned using the Purex bottle to store some of it for quick and easy access {it makes way more than what would fit in the bottle}. And one of the best parts of this whole mixture is that it only takes 1-2 tablespoons per load so it will last forever! The lid to the Purex bottle has three lines on it and the middle one is about 2 tablespoons. Easy right!? Not really. I find that the Zote soap clogs up the hole and makes it hard to pour. 
But I had put the rest of the soap in small tote to store it so it is easy to open the lid slightly and scoop out what I need. Like all powder detergents you should add it to the water before adding your clothes. It doesn't sud but trust me, this soap works great! It cleans our clothes well and makes them smell amazing! Plus, it has fabric softener in it so there is no need to add anything else. It also contains OxyClean and baking soda so it can get out a lot of stains that might otherwise require bleach. Now for my favorite part, IT MAKES MY LAUNDRY ROOM SMELL AMAZING! Seriously, sometimes I just go in there to smell. It is heavenly! Don't be surprised if you receive some of this awesomeness from us when Christmas time rolls around. It's not because we think you're dirty, it's because it is so amazing I just can't keep it to myself! So if you're thinking of trying it but just not sure, let me know and I will give you some of mine. But seriously, there is no reason not to just make it yourself. I'm sure you'll love it just as much as I do.
 
Thank you to the following for letting me take something from your closet!

Saturday, October 13, 2012

Easy as 1-2-3! {Sand, Stain, Vinyl}


Yesterday I finished a project that I'm very excited about. I was asked to do two signs. My only direction was "You're creative. I trust whatever you do will look good". So with that in mind, I had no idea where to start. Should I paint the wood and add vinyl letters? Should I paint the wood and use a vinyl stencil to paint the letters? What color paints should I use? Should I stain the wood and add vinyl letters? I had no idea. So first I had {The Man} cut my wood for me. He was already cutting up a post for another awesome project I'm working on so it was no big deal.

Next came the fun part. Sanding. I REALLY want to invest in a good power sander. It would totally be worth it for me. I've already asked for one for my birthday/Christmas. Or I found one at Walmart for only $30 that I may end up buying and forgetting to tell my husband about for a while. {He works with power tools all day, every day so he doesn't believe in buying cheep ones. He wants them to work well and last a long time.}

Once everything was silky smooth it was decision time. Paint or stain? I looked through my paints and since I wasn't sure what color she would want I decided to do black or white. Both were pretty much gone. I really wasn't in the mood to run to the store for more so my decision was made. Stain. I've only stained wood once before. It wasn't a disaster but I found painting to be much more forgiving especially on the edges of the board. I'm sure this could be solved with a good power sander though... So I grabbed my wood conditioner and started applying it to the smaller of the two signs. I used Minwax Pre-Stain Wood Conditioner left over from my last staining project. I think I got it at Home Depot. I figured I'd do the small one first and then if I didn't like it we could cut a new one. Once the wood conditioner sat for a couple minutes I wiped off the excess and applied the first coat of stain. I had two colors to choose from, ebony or dark walnut, both from Minwax. I got this from Walmart. I had decided to use white vinyl so I knew I wanted it dark but I though ebony might be too dark.

I put on the first coat of stain and I loved the color. That is, until I wiped off the excess. It was lighter than I was expecting and looked dull, not rich and shiny like the wet stain. So I added another coat and another. It was still lighter than expected. Honestly, I didn’t like it and I even told my husband I had to start over. He said he thought it looked really good and if I wasn’t going to use it for this project I should use it for something for us. I’m still not sure if he was telling the truth but I decided to stick with it anyway. I prepped the larger sign and applied the first coat of stain. The wood soaked it right up and it actually looked pretty good. I ended up only doing one coat on this one. I let both signs dry overnight.

The next morning I applied the vinyl I had cut using my Cricut and the SCAL2 software. I order all my vinyl from Expressions Vinyl. They are awesome! They have an amazing selection and great customer service. I’ve never had any issues with their products or service.

The signs were already looking better. There was only one thing missing, the clear top coat. I used Krylon Crystal Clear Flat Spray. It added just enough shine to the stain to finally make me proud to put my name on the signs. They actually looked really good! When this dried I added hardware to the back so they could be hung and I couldn’t wait to deliver them.
 

 When {The Bean} and I dropped them off everybody loved them. I held them up on the wall where they were going to go and they looked like they belonged. It was definitely a success! After this experience I think I finally have the confidence to do what my husband has been telling me to do since he bought me my Cricut, make and sell my creations. I’ve always been afraid that I would spend a bunch of money on supplies and then no one would buy from me and everything would end of sitting around collecting dust. I’m hoping to be able to make a few Christmas themed items and trying to sell those for a little extra Christmas cash. If it goes well, I’ll try and venture outside the Christmas aisle. So if you or anyone you know could use a sign or decoration with vinyl let me know!! I’m really excited and hoping that everything will work out.

Friday, October 12, 2012

{Gluten Free} Meal Reviews

So I've gotten a little behind on my {gluten free} meal reviews. To be honest, I've lost some of my oomph. There have been many days where I feel like there's no point even eating if I can't eat something I enjoy. Some things have been pretty tasty but nothing comes close to a Belgium waffle or German pancake. Or a steamy piece of pizza on a Friday night. Some days I just crave a simple pb&j. So it's kind of been going back and forth. I'll do great for a couple days and then I give up for a couple days. It's a work in progress. But here are some of our thoughts on a few of the recipes we've been trying.

Chex {Gluten Free} Apple Cinnamon Cereal
Very yummy. I'm really digging these Chex cereal flavors. Even if I wasn't worried about {gluten}.

Cottage Cheese, Fruit, Vegetable Crudites

So I've got to be honest, I didn't know what a crudite was when I looked at the meal plan. According to my research, it's chopped up veggies dipped in a sauce or dressing. So a veggie tray. Taste wise this was a good lunch although I did feel more like I was snacking than actually eating a meal. Ellie enjoyed it though. She was able to pick out the things she liked best.

Strawberry Spinach Salad

Not bad. I like poppy seed dressing but this {gluten free} brand wasn't as good as other brands I've tried. Plus, as I've said before, I'm not much of a salad fan over all.

Chicken and Potato Grill-Fry

Everyone liked this one. The recipe recommends serving it with ketchup but I only like ketchup on hamburgers and hot dogs so I used bbq sauce instead. Tasty.

Royal Red Robing Burger on a Gluten Free Bun

So obviously I didn't make this but I had to include it anyway. Red Robin carries {gluten free} buns!! From what I've read online they are Udi's {gluten free} buns but I don't know if that's what all locations carry or just the one I read about on a blog somewhere. Either way, it was delicious!! The other option is to replace the bun with lettuce, I believe they call it protein-style. The only sad part is that their amazing fry sauce is NOT {gluten free}. I was pretty bummed about that one.

Homemade Mac & Cheese
 
This cheesy bowl of goodness was actually one of my own creations. Ellie asked for mac and cheese for lunch and I didn't want to make a whole box just for her so I looked around online for a {gluten free} homemade recipe. Of the ones I could find, I didn't have all the ingredients for any of them. So I decided to throw together my own. So here is my approximate recipe. I didn't actually measure anything but this should be close. Brown rice macaroni noodles cooked till done. Drain. Stir in 1-1 1/2 cups of shredded chedder cheese, 1 ounce cream cheese, 1/4 cup milk, and sprinkle some parmesan cheese on top. Stir till it becomes one big pot of gooeyness. Sprinkle on some salt and pepper and enjoy!!
 
Chunky Spaghetti with rice pasta
This was really good. We are spaghetti fans. The sauce is definitely more chunky than saucy but it is still tasty.


Do I even have to say it? AMAZING! Peanut butter. Cookies. {Gluten free}. Duh! Of course they were good! And super easy, only four ingredients! They were slightly grainy and crumbly but still delicious!

Thank you to the following for letting me take something from your closets!

Tuesday, October 2, 2012

The {Sad} Truth

This past weekend I went home to visit my family and to attend a baby shower. I had been 100% gluten free for about a week and a half before this. At my appointment my doctor had told me to cut back on gluten and sweets. Not eliminate, just cut back. I figured I would try and be totally gluten free until my next appointment and then after that if I was totally gluten free most of the time I would be able to splurge a little here and there for holidays and special occasions and such. Well this weekend I had planned on staying totally gluten free since my appointment is this coming Thursday. I was doing great {which is hard to do in a gluten filled house} until Saturday morning at the baby shower. My friend had made the most delicious looking chicken salad croissants. And there were cinnamon rolls which looked too good to pass up on. So I figured I'd been good for a while. I could do it. I had two sandwhiches and a roll. Amazing! I {love} gluten so much! But not too long after I could already feel the headache coming on and the brain fog rolling in. Not too bad though.

Later that day my mom brought home pizza for lunch. I figured I'd already cheated I might as well have this too. Bad move. Current symptoms increased and were joined by fatigue and stomach pains. By 9:30 I couldn't stay up any longer. I was exhausted. Plus I was so bloated my slightly too big pants were tight and I had to get them off. That night my stomach hurt so bad it kept waking me up. Even in my dreams my stomach was hurting.

I was happy to get home where I have better control of what I eat and more gluten free options. I think before I didn't pay much attention to those symptoms because it was normal. That was just the way I felt. But after having them go away for a week and then come back full force, it wasn't pleasant. I am glad to know that I can make myself feel better but I'm still pretty bummed about everything I'll have to sacrifice to do it. It's always going to be a hassle. I think I can do it in my own home when I'm in charge but going out to eat? Or eating at others houses when I don't know what has gone into what? I think that will be the worst. And it couldn't have come at a worse time with the holidays coming up!

I've started to go through our fridge and pantry and marking things with a green check mark or a red X to help myself and my husband while preparing meals. We've started switching brands to gluten free options for things like soy sauce and mayo. It will take time but we'll figure it out. And family, don't be surprised to see check marks and X's on your food at some point! I'll try and be picky behind the scenes to make meal time a little easier for every one. :)

Wednesday, September 26, 2012

{Gluten Free} Meal Reviews

Breakfast - Chocolate {gluten free} Chex cereal.
This one was DELICIOUS! I think I prefer to eat it dry as a sweet snack but it was great with milk too.
My rating: A++
{The Bean's} rating: "yummy"

Lunch - Asian Spinach Salad with Soy-Sesame Vinaigrette
This was good. I would give it 3/5 stars. If I were more of a salad eater I'd probably give it 4 stars. I could have done without the onions. I'm not really a fan. The dressing was okay. I'm a ranch girl usually so this was a big change. I'm not sure if it makes a difference but I didn't have any white wine vinegar so I used distilled white vinegar and I only did 2 tablespoons instead of 3 in case it made it taste awful. Over all, a decent meal. I could eat it again but it may not be at the top of my list. But if you are a salad eater, I would recommend it.
My rating: B-
 
These were actually really good! The pork smelled AMAZING in the crock pot all day and that made this meal super fast and easy to throw together after work. Obviously pulled pork would have tasted better on a bun with a side of fries but I would definitely do it this way again. I think this would make for a great summer meal especially with the pineapple which was also delicious!
My rating: A-
{The Man's} rating: 4/5 stars
{The Bean's} rating: she ate it
 

Monday, September 24, 2012

{Gluten Free} That's Me!

Well I just finished my first {gluten free} shopping trip and let me just say, it sucked. I seriously wanted to leave my cart in an aisle and walk out to my car and cry. I spent about an hour in the produce section looking for various items that I didn't know existed. I bought an egg plant. The only thing I know about egg plants is that they are purple. I spent forever reading every label in the bulk section to find quinoa only to find it was sold out. Then I couldn't find any plain, {gluten free} quinoa by the rice. I sat in the cracker aisle for another 15 minutes looking for regular {gluten free} crackers. I finally settled on Nut Thins so we'll see how that goes. I also found out that {gluten free} subsitutes like bread and bisquick are TINY and expensive. At this point I am taking things one day at a time. I found a meal plan and shopping list at www.5dollardinners.com. I purchased everything from week 1 of the shopping list and spent twice the amount we usually spend on groceries for the entire month. I haven't looked through all the recipes yet. I can't. I've got tomorrow figured out and an idea for Wednesday. That's all I can handle for now.
I also signed up for an email newsletter at http://www.glutenfreecookingschool.com/. She sends emails almost daily that are directed to people like me that are new to the {gluten free} lifestyle. These emails include tips and recipes as well as some tough love and a look into what happens in your body and how going {gluten free} can heal you from the inside out.
I have also downloaded a couple apps called ipiit and find me GLUTEN FREE. They help you find {gluten free} restaurants and meal choices and alternatives.
My last resource worth mentioning is Pinterest. I've searched for {gluten free} meals a few times. I've come across a few that look pretty good but it mostly brings up {gluten free} sweets, pastries, cookies, and all the other things you think you can never have again when you begin a {gluten free} lifestyle. Even is I'm not to the point that I have the time and knowledge to make most of the stuff, it's nice to know there is hope.
I do have to say that I'm kind of excited for tomorrow's meals. They better taste as good as they look in the pictures. Here's what's on the menu for tomorrow:

Breakfast - {Gluten Free} Chex, I bought three flavors so I wouldn't get bored.

Lunch - Asian Spinach Salad with Soy-Sesame Vinaigrette
spinach salad

Ingredients
 1 bag baby spinach leaves
1 15 ounce can Mandarin oranges, drained
1 red onion, diced
¾ cup chopped walnuts {this was not listed on the shopping list}

Soy-Sesame Vinaigrette
 ¼ cup olive oil
3 Tablespoon white wine vinegar {neither was this}
2 Tablespoon soy sauce
1 teaspoon sesame seeds
¼ teaspoon ground ginger
A pinch of sugar
Dash of pepper

Directions
 1. In a serving bowl, toss together the spinach leaves, Mandarin orange pieces, diced red onions and chopped walnuts.
 2. Pour the soy-sesame vinaigrette over the top of the salad and serve.
 Makes four lunch portions.

Dinner - Sesame Pulled Pork Lettuce Wraps
Ingredients
  • About 1 pound BBQ pulled pork, cooked in slow cooker ($1.99 for 1 lb. pork +$.25 for BBQ)
  • 3 Tbsp soy sauce - Use GF if GF icon smile Sesame Pulled Pork Lettuce Wraps ($.10)
  • 2 tsp sesame oil ($.30)
  • 1 tsp garlic powder ($.05)
  • 1 tsp onion powder ($.05)
  • 1 tsp ground ginger ($.05)
  • Dashes of pepper
  • Large or small lettuce leaves from the garden
  • 1 medium carrot, peeled and grated ($.10)
  • Side dish ideas – pineapple, cooked sweet potatoes ($.79)
Directions
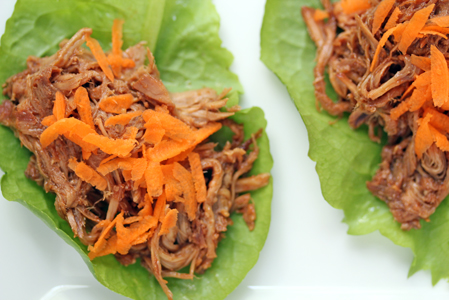
  •  Place a 2-3 lb. pork roast in the slow cooker. Pour about 1/2 cup water in the base, then pour 1/2 cup BBQ sauce over the top. Cook on low for 8 hours. When done cooking, remove from the slow cooker and using 2 forks, pull the meat apart. Split the pulled pork into 2 meals worth…one for this meal, and the rest for BBQ pulled pork sliders.
  • In a small bowl, whisk together the soy sauce, sesame oil, garlic powder, onion powder and ground ginger with a few dashes of pepper. Pour over the half of the pulled pork that you will use for the lettuce wraps.
  • Pick and clean a few lettuce leaves…or get some from the fridge!
  • Place some of the Sesame Pulled Pork into the lettuce and top with some grated carrots.
  • Serve Sesame Pulled Pork Lettuce Wraps with pineapple or cooked sweet potatoes!
 
I know it's going to be a rough road but hopefully it will be worth it. If anything, at least a learn a little bit more about cooking.
 
Thanks to the following for letting me take something from your closets!


{Bean} School

As a child being raised in an office {The Bean} has learned many useful skills like using a garage door opener to open the gate, how to drive the golf cart, how to sweep out a unit, and that she must be quiet while I'm on the phone. But a two year old can only take so many hours of watching TV and napping. Just like anyone else, she gets bored sitting around all day with nothing to do. So with back to school time came {Bean} School. Each week we will be working on the name and sound of each letter along with art and craft projects and some sort of experiment or sensory activity. She can already name most of the letters when I point to them which is why I decided to add the sounds.

Week 1 {Aa}
This was the first week so she was still excited to color with me rather then do it alone or make me do it alone. She always really enjoys painting so we did a little paint project. For our experiment we did a sparkly vinegar and baking soda volcano. I got the inspiration for this project {here}. At some point I would like to somehow match our activity to the letter of the week {like S for sparkly or V for volcano} but for now we'll stick with doing whatever we feel like at the time.


Earlier in the day she had gone with me to the doctor where we talked through the experience of them drawing my blood. So when she was painting she kept commenting on how the red paint looked like blood.
Thanks to the following for letting us take something from your closets!
 
Week 2 {Bb}
During {Bb} week we practiced the sound of the letter B more than the first week. She had picked up on the A sound so quickly and so well she kept saying it for B. We also talked about words that start with B. For our activity we made cloud sand (a homemade variation of moon sand that I found here.) {The Bean} LOVED the cloud sand but it turned out to be super messy. Luckily we did it outside although you could vacuum it up easy enough. We discussed how the sand felt {soft}, how it smelled {good}, how it looked {white}, and all on her own she discovered what it tasted like {yummy}. I only made a half batch since it uses a lot of flour but we were still able to save enough from being spread across the sidewalk to play with it another day.
 

Thanks to the following for letting us take something from your closets!